
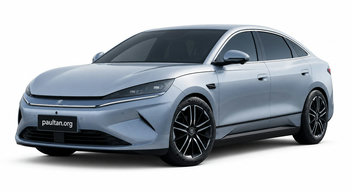

Verdict
For RM888 less, the BYD Seal 6 brings a 460-litre boot, 2,820-mm wheelbase, dual-zone climate control and a six-year/150,000-km vehicle warranty. It is the more family-minded sedan, but its 129-hp motor needs 10.9 seconds to reach 100 km/h. The MG 4 is far quicker at 7.7 seconds with 200 hp, and its 64-kWh battery delivers 435 km versus 410 km. Its 150-kW DC charging and 11-kW AC charging also better suit frequent longer trips, although annual road tax is RM160 against RM70.
Pick the BYD Seal 6 if you want the lower RM100,000 entry price, a 460-litre boot and more rear-seat climate and charging provision.
Pick the MG 4 if you want 200 hp, a 7.7-second 0-100 km/h time and faster 11-kW AC/150-kW DC charging.
Key differences
- Price: BYD Seal 6 RM100,000; MG 4 RM100,888.
- Performance: BYD Seal 6 129 hp, 220 Nm and 10.9 sec 0-100 km/h; MG 4 200 hp, 250 Nm and 7.7 sec.
- Battery and range: BYD Seal 6 56.64 kWh and 410 km; MG 4 64 kWh and 435 km.
- Charging: BYD Seal 6 7 kW AC and 100 kW DC; MG 4 11 kW AC and 150 kW DC.
- Dimensions and boot: BYD Seal 6 is 4,720 mm long with a 460-litre boot; MG 4 is 4,287 mm long with a 363-litre boot.
- Road tax and V2L: BYD Seal 6 RM70/year and 3.3 kW; MG 4 RM160/year and 2.5 kW.
Seal 6
- RM888 cheaper to buy
- 460-litre boot and 2,820-mm wheelbase
- Dual-zone climate control, rear AC vents and wireless phone integration
- 129 hp and 10.9-second 0-100 km/h time trail the MG 4
- 7-kW AC and 100-kW DC charging are slower
- No blind spot information system; lane keeping only warns
4
- 200 hp, 250 Nm and 7.7-second 0-100 km/h
- 64-kWh battery, 435-km range and 150-kW DC charging
- Blind spot information system and lane-keeping steering correction
- RM888 higher purchase price and RM90 higher annual road tax
- 363-litre boot is 97 litres smaller
- Five-year unlimited-mileage vehicle warranty versus six years/150,000 km
What the Seal 6 has over the 4
What the 4 has over the Seal 6
Based on the published spec sheets of the selected variants — a blank field on one side can also mean unlisted data.
The Seal 6's wheelbase is 115 mm longer, which usually translates to more rear legroom. Boot space favours the Seal 6: 460 litres against 363.
Representative body-type outlines, drawn to scale from each car's length and height.
| Price & overview | ||
|---|---|---|
| Price | RM100,000✓ | RM100,888 |
| Body type | Sedan | Hatchback |
| Segment | C-Segment | C-Segment |
| Assembly | CBU | CBU |
| Ownership | ||
| Road tax / year | RM70✓ | RM160 |
| Monthly instalment (est.) | RM1,020/mo✓ | RM1,030/mo |
| Insurance / year (est.) | RM2,848✓ | RM2,871 |
| Electricity / year (est.) | RM1,228✓ | RM1,307 |
| Energy cost / 100 km (est.) | RM6.14✓ | RM6.54 |
| 5-year running costs (est.) | RM20,727✓ | RM21,691 |
| Charging (estimated) | ||
| AC charge 0–100% (est.) | 8.1 hours | 5.8 hours✓ |
| DC charge 10–80% (est.) | 40 min | 30 min✓ |
| Powertrain | ||
| Engine Tech | 400V architecture | 400V architecture |
| Fuel | Electric | Electric |
| Number of Motors | 1 | 1 |
| Motor Horsepower | 129 hp | 200 hp✓ |
| Motor Torque | 220 Nm | 250 Nm✓ |
| Battery Capacity | 56.64 kWh | 64 kWh✓ |
| EV Range | 410 km | 435 km✓ |
| Charging Rate (AC) | 7 kW | 11 kW✓ |
| Charging Rate (DC) | 100 kW | 150 kW✓ |
| V2L | 3.3 kW | 2.5 kW |
| Drivetrain | ||
| Transmission | Single Ratio Automatic | Single Ratio Automatic |
| Driveline | Rear Wheel Drive | Rear Wheel Drive |
| Performance & Efficiency | ||
| 0-100 km/h | 10.9 seconds | 7.7 seconds✓ |
| Top Speed | 160 km/h | 160 km/h |
| Dimensions | ||
| Length | 4,720 mm | 4,287 mm |
| Width | 1,860 mm | 1,836 mm |
| Height | 1,495 mm | 1,504 mm |
| Wheelbase | 2,820 mm | 2,705 mm |
| Weight | — | 1,685 kg |
| Doors | 4 | 5 |
| Seats | 5 | 5 |
| Boot Space | 460 litres✓ | 363 litres |
| Front Tyre | 225/55R17 | 235/45R18 |
| Rear Tyre | 225/55R17 | 235/45R18 |
| Spare Tyre | N/A, Tyre Repair Kit | Tyre Repair Kit |
| Factory Tyres | — | Bridgestone Turanza T005 EV |
| Wiper Blade (Driver) | — | 24 inch |
| Wiper Blade (Passenger) | — | 16 inch |
| Chassis | ||
| Assembly | China (CBU) | China (CBU) |
| Front Suspension | MacPherson Strut | MacPherson Struts |
| Rear Suspension | Multi-link | Multi-link |
| Front Wheels | 17" Alloy | 18" Alloys |
| Rear Wheels | 17" Alloy | 18" Alloys |
| Steering | Rack and Pinion (Electric Power Steering) | Rack and Pinion (Electric Power Steering) |
| Safety | ||
| Airbags | 6 (Driver and Passenger, Driver Far Side, Front Side, Front and Rear Curtain) | 6 (Driver and Passenger, Front Side, Front and Rear Curtain) |
| ABS/EBD | ✓ | ✓ |
| Stability Control | ✓ | ✓ |
| Alarm | ✓ | ✓ |
| Immobilizer | ✓ | ✓ |
| Airbag Disable Function | ✓ | — |
| Child Safety Lock | Manual for Rear Doors | Manual For Rear Doors |
| Seat Belts | 5 Three-point | 5 Three-point |
| Blind Spot Info System | — | ✓ |
| ISOFIX | Available for Two Outer Rear Passenger Seats | Available On Outer Two Rear Seats |
| Autonomous Braking System | Yes | Yes |
| Lane-keeping Assist | Warning Only | Steering Correction |
| Collision Warning | ✓ | ✓ |
| Seatbelt Reminder | All Seats | All Seats |
| Lighting | ||
| Headlamps | LED Projector with Auto High Beam | LED Projector |
| Taillamps | Full LED | LED Combination |
| LED Daytime Running Lights | ✓ | ✓ |
| Rear Foglamps | ✓ | ✓ |
| Wing Mirror Turn Indicators | ✓ | ✓ |
| Cabin | ||
| Front Seats | Power-adjustable Front Seats | Power Adjustable Driver's Seat, Manual Adjustable Front Passenger Seat |
| Rear Seats | 60:40 Split-folding | 60:40 Split-folding |
| Front Air-con | Dual-zone Automatic Climate Control | Single-zone Automatic Climate Control |
| Rear Air-con | Rear AC Vents | — |
| Power Sockets | 1 Front, 1 Wireless Charger, 2 USB Front, 2 USB Rear | 1 Front, 3 USB |
| Interior Lighting | Map Lights | Map Lights |
| Cup Holders | 2 Front, 2 Rear | 2 Front, 2 Rear |
| Audio | 12.8" Touchscreen with Wireless Apple CarPlay & Android Auto, 6-speakers | 10.25" Touchscreen with Wired Apple CarPlay & Android Auto |
| Convenience | ||
| Power Windows | Four Windows, Auto Up and Down with Anti-Pinch | Four Windows, Auto Up and Down |
| Engine Start | Keyless Push Button | Keyless Push Button |
| Locks | Keyless Operation | Keyless Operation |
| Auto Headlamps | ✓ | ✓ |
| Auto Wipers | ✓ | — |
| Cruise Control | Adaptive Cruise Control | Adaptive Cruise Control |
| Steering Audio Control | ✓ | ✓ |
| Steering Tilt | ✓ | ✓ |
| Steering Telescopic | ✓ | ✓ |
| Boot Operation | Remote Control Activation | Manual Operation |
| Parking Sensor Front | 2 Sensors | — |
| Parking Sensor Rear | 4 Sensors | 4 Sensors |
| Reverse Camera | Yes, with 360-degree Camera | Yes, 360-degree Camera |
| Folding Wing Mirrors | ✓ | ✓ |
| Bluetooth | ✓ | ✓ |
| Hill Start Assist | ✓ | ✓ |
| Instrument Cluster | Full LCD Monitor | Full LCD Monitor |
| Parking Brake | Electronic | Electronic |
| Warranty | ||
| Warranty Mileage Manufacturer | 150,000 km | Unlimited✓ |
| Warranty Manufacturer | 6 years✓ | 5 years |
| Warranty Notes | 8-year/160,000-km Battery Warranty, 8-year/150,000-km Electric Drive Unit Warranty | 8-year/150,000 km Battery Warranty |
Specs shown for the selected variant of each car. ✓ marks the better figure where lower/higher is objectively better. Road tax: West Malaysia, private registration. Running-cost estimates assume 20,000 km/year. Electricity at RM0.44/kWh (TNB domestic, home charging); public DC charging costs around RM1.30/kWh. Charging times estimated from battery capacity and peak charging rates. Insurance: comprehensive motor tariff, no NCD. Instalment: 10% down, 2.5% flat rate, 9 years. Prices checked November 2026.
Used Seal 6 & 4 for sale
Our reviews & guides
BYD Seal 6


MG 4


Seal 6 vs 4 FAQ
Is the BYD Seal 6 or MG 4 better?
The MG 4 is better for performance, range and charging, with 200 hp, 435 km and 150-kW DC charging. The BYD Seal 6 is better for boot space, rear-cabin equipment and annual road tax, with a 460-litre boot and RM70 road tax.
What is the price difference?
The BYD Seal 6 costs RM100,000 and the MG 4 costs RM100,888, so the MG 4 is RM888 more expensive.
Which has the better charging capability?
The MG 4 does. Its 11-kW AC and 150-kW DC charging rates exceed the BYD Seal 6's 7-kW AC and 100-kW DC figures. The Seal 6 has the stronger 3.3-kW V2L output, against 2.5 kW.
How long does charging take?
The Seal 6's 56.6 kWh battery takes about 8.1 hours for a full AC charge, and an estimated 40 minutes from 10% to 80% on a DC fast charger at its 100 kW peak. The 4's 64.0 kWh battery takes about 5.8 hours for a full AC charge, and an estimated 30 minutes from 10% to 80% on a DC fast charger at its 150 kW peak.
Which has the better warranty?
The Seal 6 carries a 6-year manufacturer warranty against 5 years for the 4. Seal 6: 8-year/160,000-km Battery Warranty, 8-year/150,000-km Electric Drive Unit Warranty. 4: 8-year/150,000 km Battery Warranty.