
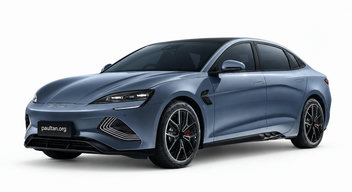
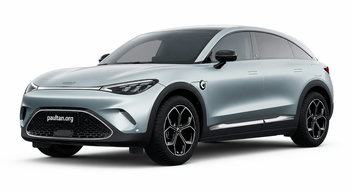
Verdict
At RM171,800, the BYD Seal costs RM3,200 less than the RM175,000 smart #3 yet brings an 82.56-kWh LFP battery and 570 km of range, against 49 kWh and 325 km. That 245-km range advantage matters far more than the smart’s 0.1-second 0-100 km/h edge: 5.9 versus 5.8 seconds. The Seal also has 308 hp, 360 Nm, a 400-litre boot and V2L. The smart counters with much quicker 22-kW AC charging versus 7 kW, five doors and auto parking. For most Malaysian buyers, the Seal is the stronger numbers-led choice.
Pick the BYD Seal if you want 570 km of range, 308 hp and 360 Nm for RM3,200 less.
Pick the smart #3 if 22-kW AC charging, a five-door SUV body and auto parking matter more than battery capacity and range.
Key differences
- Price: BYD Seal RM171,800; smart #3 RM175,000.
- Battery and range: BYD Seal 82.56 kWh and 570 km; smart #3 49 kWh and 325 km.
- Motor output: BYD Seal 308 hp and 360 Nm; smart #3 268 hp and 343 Nm.
- AC charging: BYD Seal 7 kW; smart #3 22 kW.
- Body and boot: BYD Seal four-door sedan with 400 litres; smart #3 five-door SUV with 370 litres.
- Acceleration: BYD Seal 0-100 km/h in 5.9 seconds; smart #3 in 5.8 seconds.
Seal
- 245 km more stated EV range.
- More power and torque: 308 hp and 360 Nm.
- 400-litre boot, V2L and a head-up display.
- 7-kW AC charging versus the smart #3's 22 kW.
- 0-100 km/h is 0.1 seconds slower.
- Four doors versus the smart #3's five.
#3
- 22-kW AC charging.
- Five-door SUV body and auto parking.
- Slightly quicker 5.8-second 0-100 km/h time.
- 325-km range versus the Seal's 570 km.
- 49-kWh battery versus the Seal's 82.56 kWh.
- Less motor output and boot space: 268 hp, 343 Nm and 370 litres.
| Price & overview | ||
|---|---|---|
| Price | RM 171,800✓ | RM 175,000 |
| Body type | Sedan | SUV |
| Segment | C-Segment | C-Segment |
| Assembly | CBU | CBU |
| Powertrain | ||
| Fuel | Electric | Electric |
| Number of Motors | 1 | 1 |
| Motor Horsepower | 308 hp✓ | 268 hp |
| Motor Torque | 360 Nm✓ | 343 Nm |
| Battery Type | Lithium Iron Phosphate | Lithium Iron Phosphate (LFP) |
| Battery Capacity | 82.56 kWh✓ | 49 kWh |
| EV Range | 570 km✓ | 325 km |
| Charger Type (AC) | Type 2 | Type 2 |
| Charging Rate (AC) | 7 kW | 22 kW✓ |
| Charger Type (DC) | CCS | CCS |
| Charging Rate (DC) | 150 kW | 150 kW |
| V2L | 3.3 kW | — |
| Drivetrain | ||
| Transmission | Single Ratio Automatic | Single Ratio Automatic |
| Driveline | Rear Wheel Drive | Rear Wheel Drive |
| Performance & Efficiency | ||
| 0-100 km/h | 5.9 seconds | 5.8 seconds✓ |
| Top Speed | 180 km/h | 180 km/h |
| Dimensions | ||
| Length | 4,800 mm | 4,400 mm |
| Width | 1,875 mm | 1,844 mm |
| Height | 1,460 mm | 1,556 mm |
| Wheelbase | 2,920 mm | 2,785 mm |
| Weight | 2,055 kg | — |
| Doors | 4 | 5 |
| Seats | 5 | 5 |
| Boot Space | 400 litres✓ | 370 litres |
| Front Tyre | 235/45R19 | 245/45R19 |
| Rear Tyre | 235/45R19 | 245/45R19 |
| Spare Tyre | N/A, Tyre Repair Kit | — |
| Factory Tyres | Continental EcoContact 6 Q | Dunlop SP Sport Maxx 060 |
| Chassis | ||
| Assembly | China (CBU) | China (CBU) |
| Chassis | Unibody | Unibody |
| Front Suspension | Double Wishbones | MacPherson Struts |
| Rear Suspension | Multi-link | Multi-link |
| Front Wheels | 19" Alloys | 19" Flux Alloy Wheels |
| Rear Wheels | 19" Alloys | 19" Flux Alloy Wheels |
| Front Brakes | Ventilated Discs | Ventilated Discs |
| Rear Brakes | Solid Discs | Solid Discs |
| Steering | Rack and Pinion (Electric Power Steering) | Rack and Pinion (Electric Power Steering) |
| Chassis Notes | Frequency Selective Damping | — |
| Safety | ||
| Airbags | Driver and Front Passenger, Front Side, Front and Rear Curtain, Driver's Knee Airbag | Driver & Front Passenger, Side Airbags, Curtain Airbags and Driver's Knee Airbag |
| ABS/EBD | ✓ | ✓ |
| Stability Control | ✓ | ✓ |
| Alarm | ✓ | ✓ |
| Immobilizer | ✓ | ✓ |
| Child Safety Lock | Manual for Rear Doors | Manual for Rear Doors |
| Seat Belts | 5 Three-point | 5 Three-point |
| Blind Spot Info System | ✓ | ✓ |
| ISOFIX | Available on Front Passenger and Outer Two Rear Seat | Available On Front Passenger Seat, Rear Outer Seats |
| Autonomous Braking System | Yes | Yes, Front and Rear |
| Lane-keeping Assist | Steering Correction | Steering Correction |
| Collision Warning | ✓ | ✓ |
| Seatbelt Reminder | All Seats | All Seats |
| Lighting | ||
| Headlamps | LED Projector with Auto High Beam | LED Reflector with Manual Levelling |
| Taillamps | Full LED | LED |
| LED Daytime Running Lights | ✓ | ✓ |
| Rear Foglamps | ✓ | ✓ |
| Wing Mirror Turn Indicators | ✓ | ✓ |
| Cabin | ||
| Front Seats | Power-adjustable Front Seats, Ventilated with Driver's Side Memory Function | Driver and Passenger Powered Seats |
| Rear Seats | 60:40 Split-folding | 60:40 Split-folding |
| Front Air-con | Dual-zone Automatic Climate Control | Single-zone Automatic Climate Control |
| Rear Air-con | Rear AC Vents | Rear AC Vents |
| Sunroof | Panoramic Glass Roof | Panoramic Glass Roof |
| Power Sockets | 1 Front, 2 Front USB, 2 Rear USB, 2 Wireless Chargers | 1 Front, 2 USB-C Front, 2 USB-C Rear, 1 Wireless Charger |
| Interior Lighting | Map Lights and Ambient Lights | Map Lights & Ambient Lighting |
| Cup Holders | 2 Front, 2 Rear | 2 Front, 2 Rear |
| Sun Shade | Panoramic Glass Roof Shade | Manual Sunshade for Glass Roof |
| Audio | 15.6" Rotating Touchscreen with Apple CarPlay & Android Auto, 12-speaker Dynaudio HiFi Audio System | 12.8" Touchscreen with Wireless Apple CarPlay & Android Auto |
| Convenience | ||
| Power Windows | Four Windows, Auto Up and Down with Anti-Pinch | Four Windows, Auto Up and Down with Anti Pinch |
| Engine Start | Keyless Push Button | Keyless (Depress Brake Pedal) |
| Locks | Keyless Operation | Keyless Operation |
| Auto Headlamps | ✓ | ✓ |
| Auto Wipers | ✓ | ✓ |
| Cruise Control | Adaptive Cruise Control with Stop and Go | Adaptive Cruise Control |
| Steering Audio Control | ✓ | ✓ |
| Steering Tilt | ✓ | ✓ |
| Steering Telescopic | ✓ | ✓ |
| Boot Operation | Powered Boot | Yes, Powered |
| Parking Sensor Front | 2 Sensors | 4 Sensors |
| Parking Sensor Rear | 4 Sensors | 4 Sensors |
| Reverse Camera | Yes, with 360-degree Camera | Yes, With 360-degree Camera |
| Auto Parking | — | Yes |
| Folding Wing Mirrors | ✓ | ✓ |
| Bluetooth | ✓ | ✓ |
| Navigation | ✓ | ✓ |
| Head-up Display | ✓ | — |
| Hill Start Assist | ✓ | ✓ |
| Instrument Cluster | Full LCD Monitor | Full LCD Monitor |
| Parking Brake | Electronic | Electronic |
| Warranty | ||
| Warranty Mileage Manufacturer | 150,000 km | Unlimited✓ |
| Warranty Manufacturer | 6 years✓ | 4 years |
| Warranty Notes | 8-year/160,000-km Battery Warranty, 8-year/150,000-km Electric Drive Unit Warranty | 8-year/200,000 km Battery Warranty |
| Ownership | ||
| Road tax / year | RM 335 | RM 260✓ |
Specs shown for the selected variant of each car. ✓ marks the better figure where lower/higher is objectively better. Road tax: West Malaysia, private registration.
Used Seal & #3 for sale
Seal vs #3 FAQ
Is the BYD Seal or smart #3 better?
The BYD Seal is the better buy on the core EV numbers: it is RM3,200 cheaper, has 570 km of range versus 325 km, and produces 308 hp versus 268 hp. Choose the smart #3 for 22-kW AC charging, five doors and auto parking.
What is the price difference?
The BYD Seal costs RM171,800 and the smart #3 costs RM175,000, so the Seal is RM3,200 cheaper.
Which one charges faster at home or AC public chargers?
The smart #3 charges faster on AC at up to 22 kW, compared with 7 kW for the BYD Seal. Both use Type 2 AC connectors and support up to 150 kW DC charging through CCS.