
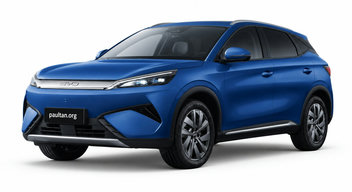
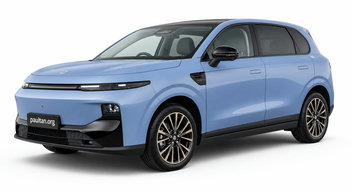
Verdict
The Leapmotor B10 costs RM7,000 less at RM118,800, brings a 67.1 kWh battery and claims 434 km, versus the BYD Atto 3’s 60.48 kWh and 420 km. It also supports 11 kW AC charging against 7 kW. But the Atto 3 is much quicker, reaching 100 km/h in 7.3 seconds against 9.3 seconds, and has 310 Nm to the B10’s 240 Nm. Its published 110 kW DC rate, 3.3 kW V2L output and 434-litre boot make it the more rounded long-trip choice; pick the B10 for the lower entry price and local CKD assembly.
Pick the BYD Atto 3 if you want the 7.3-second 0-100 km/h performance, 110 kW DC charging figure and stronger 3.3 kW V2L output.
Pick the Leapmotor B10 if saving RM7,000, gaining 14 km of stated range and having 11 kW AC charging matter more than outright acceleration.
Key differences
- Price: BYD Atto 3 RM125,800; Leapmotor B10 RM118,800.
- Motor output: BYD Atto 3 201 hp and 310 Nm; Leapmotor B10 215 hp and 240 Nm.
- 0-100 km/h: BYD Atto 3 7.3 seconds; Leapmotor B10 9.3 seconds.
- Battery and range: BYD Atto 3 60.48 kWh and 420 km; Leapmotor B10 67.1 kWh and 434 km.
- AC charging: BYD Atto 3 7 kW; Leapmotor B10 11 kW.
- V2L output: BYD Atto 3 3.3 kW; Leapmotor B10 1.7 kW.
Atto 3
- Quicker 7.3-second 0-100 km/h time and 310 Nm.
- Published 110 kW DC charging rate.
- 434-litre boot and 3.3 kW V2L output.
- Costs RM7,000 more.
- Smaller 60.48 kWh battery and 420 km stated range.
- 7 kW AC charging versus the B10’s 11 kW.
B10
- RM118,800 price and Malaysian CKD assembly.
- 67.1 kWh battery with 434 km stated range.
- 11 kW AC charging, plus built-in navigation and dual-zone climate control.
- Slower 9.3-second 0-100 km/h time despite its 215 hp output.
- Lower 240 Nm torque and weaker 1.7 kW V2L output.
- DC charging rate is not specified, while the Atto 3 is rated at 110 kW.
| Price & overview | ||
|---|---|---|
| Price | RM125,800 | RM118,800✓ |
| Body type | SUV | SUV |
| Segment | C-Segment | C-Segment |
| Assembly | CBU | CKD |
| Ownership | ||
| Road tax / year | RM160✓ | RM200 |
| Powertrain | ||
| Engine Tech | 400V architecture | 400V architecture |
| Fuel | Electric | Electric |
| Number of Motors | 1 | 1 |
| Motor Horsepower | 201 hp | 215 hp✓ |
| Motor Torque | 310 Nm✓ | 240 Nm |
| Battery Capacity | 60.48 kWh | 67.1 kWh✓ |
| EV Range | 420 km | 434 km✓ |
| Charging Rate (AC) | 7 kW | 11 kW✓ |
| Charging Rate (DC) | 110 kW | — |
| V2L | 3.3 kW | 1.7 kW |
| Drivetrain | ||
| Transmission | Single Ratio Automatic | Single Ratio Automatic |
| Driveline | Front Wheel Drive | Rear Wheel Drive |
| Performance & Efficiency | ||
| 0-100 km/h | 7.3 seconds✓ | 9.3 seconds |
| Top Speed | — | 170 km/h |
| Dimensions | ||
| Length | 4,455 mm | 4,515 mm |
| Width | 1,875 mm | 1,885 mm |
| Height | 1,615 mm | 1,655 mm |
| Wheelbase | 2,720 mm | 2,735 mm |
| Weight | 1,750 kg | 1,845 kg |
| Doors | 5 | 5 |
| Seats | 5 | 5 |
| Boot Space | 434 litres✓ | 430 litres |
| Front Tyre | 235/50R18 | 225/50R18 |
| Rear Tyre | 235/50R18 | 235/50R18 |
| Spare Tyre | N/A, Tyre Repair Kit | N/A, Tyre Repair Kit |
| Factory Tyres | Continental EcoContact 6 Q | Linglong Sport Master e |
| Chassis | ||
| Assembly | China (CBU) | Malaysia (CKD) |
| Front Suspension | MacPherson Struts | MacPherson Struts |
| Rear Suspension | Multi-link | Multi-link |
| Front Wheels | 18" Alloy | 18" Alloys |
| Rear Wheels | 18" Alloy | 18" Alloys |
| Steering | Rack and Pinion (Electric Power Steering) | Rack & Pinion (Electric Power Steering) |
| Safety | ||
| Airbags | Driver and Front Passenger, Front Side, Front and Rear Curtain | Driver and Front Passenger, Front Side, Curtain and Far Side |
| ABS/EBD | ✓ | ✓ |
| Stability Control | ✓ | ✓ |
| Alarm | — | ✓ |
| Immobilizer | ✓ | ✓ |
| Airbag Disable Function | ✓ | ✓ |
| Child Safety Lock | Manual for Rear Doors | Manual for Rear Doors |
| Seat Belts | 5 Three-point | 5 Three-point |
| Blind Spot Info System | ✓ | ✓ |
| ISOFIX | Available for Two Outer Rear Passenger Seats | Available on Outer Two Rear Seats |
| Autonomous Braking System | Yes | Yes |
| Lane-keeping Assist | Steering Correction | Steering Correction |
| Collision Warning | ✓ | ✓ |
| Seatbelt Reminder | All Seats | All Seats |
| Lighting | ||
| Headlamps | LED Projector with Auto High Beam | LED Projector |
| Taillamps | Full LED | Full LED |
| LED Daytime Running Lights | ✓ | ✓ |
| Front Foglamps | — | ✓ |
| Rear Foglamps | ✓ | ✓ |
| Wing Mirror Turn Indicators | ✓ | ✓ |
| Cabin | ||
| Front Seats | Power-adjustable Front Seats, Ventilated | Power Adjustable Front Seats |
| Rear Seats | 60:40 Split-folding | 60:40 Split-folding |
| Front Air-con | Single-zone Automatic Climate Control | Dual-zone Automatic Climate Control |
| Rear Air-con | Rear AC Vents | Rear AC Vents |
| Sunroof | Panoramic, Tilt and Slide | Panoramic Glass Roof |
| Power Sockets | 1 Front, 1 Wireless Charger, 2 USB Front, 2 USB Rear | 1 Front, 1 Wireless Charger, 2 USB Front, 2 USB Rear |
| Interior Lighting | Map Lights & Ambient Lighting | Map Lights & Ambient Lighting |
| Cup Holders | 2 Front, 2 Rear | 2 Front, 2 Rear |
| Sun Shade | Panoramic Glass Roof Shade | Sunroof Shade |
| Audio | 15.6" Touchscreen with Apple CarPlay & Android Auto with 6 Speakers | 14.6" Touchscreen with Wireless Apple CarPlay & Android Auto, Satellite Navigation, WiFi built-in, 6-speaker Sound System |
| Convenience | ||
| Power Windows | Four Windows, Auto Up and Down with Anti-Pinch | Four Windows, Auto Up & Down with Anti-pinch |
| Engine Start | Keyless Push Button | Keyless Start (Depress Brake Pedal) |
| Locks | Keyless Operation | Keyless Operation (NFC Card) |
| Auto Headlamps | ✓ | ✓ |
| Auto Wipers | ✓ | ✓ |
| Cruise Control | Adaptive Cruise Control with Stop and Go | Adaptive Cruise Control |
| Steering Audio Control | ✓ | ✓ |
| Steering Tilt | ✓ | ✓ |
| Steering Telescopic | ✓ | ✓ |
| Boot Operation | Powered Boot | Powered Boot |
| Parking Sensor Front | 2 Sensors | — |
| Parking Sensor Rear | 4 Sensors | 4 Sensors |
| Reverse Camera | Yes, with 360-degree Camera | Yes, 360-degree Monitor |
| Folding Wing Mirrors | ✓ | ✓ |
| Bluetooth | ✓ | ✓ |
| Navigation | — | ✓ |
| Hill Start Assist | ✓ | ✓ |
| Instrument Cluster | Full LCD Monitor | Full LCD Monitor |
| Parking Brake | Electronic | Electronic |
| Warranty | ||
| Warranty Mileage Manufacturer | 150,000 km | 150,000 km |
| Warranty Manufacturer | 6 years | 6 years |
| Warranty Notes | 8-year/160,000-km Battery Warranty, 8-year/150,000-km Electric Drive Unit Warranty | 8 Year/160,000 km BEV Warranty, 8-year/160,000 km Battery Warranty |
Specs shown for the selected variant of each car. ✓ marks the better figure where lower/higher is objectively better. Road tax: West Malaysia, private registration.
Used Atto 3 & B10 for sale
Atto 3 vs B10 FAQ
Is the BYD Atto 3 or Leapmotor B10 better?
The BYD Atto 3 is the better all-round pick if performance, a published 110 kW DC charging rate and 3.3 kW V2L matter. The Leapmotor B10 makes more sense if you prioritise its RM7,000 lower price, 434 km range and 11 kW AC charging.
What is the price difference?
The Leapmotor B10 is RM7,000 cheaper: RM118,800 versus RM125,800 for the BYD Atto 3.
Which one charges faster at home?
The Leapmotor B10 has the higher AC charging rating at 11 kW, compared with 7 kW for the BYD Atto 3. The Atto 3 has a published 110 kW DC charging rate; no DC charging rate is specified for the B10.